WELCOME TO THE FUSION HELP PAGE
FUSION is Firefly Orthoses’ 3D scanning application for iOS. We have compiled some FAQs (frequently asked questions) and a feed-back form to report any bugs you may encounter using the app. Please leave a message below and we will respond to you. We welcome all feedback!
FREQUENTLY ASKED QUESTIONS
HOW DO I CALIBRATE MY STRUCTURE SENSOR SCANNER?
The instructions below are taken from the Structure Sensor website.
You will require the Calibration App downloadable from the app store.
You can view a demo video here.
Indoor Calibration Mode
If you are calibrating at night, or in an area of the world that doesn’t see a lot of clear skies, you may not have enough ambient infrared [IR] to complete Outdoor Calibration. Not to worry! If you are at this screen for five seconds, a toggle in the lower left corner will show up to enable Indoor Mode.

What this does is adjust the exposure and gain settings of the sensor, making it more sensitive to IR light.
You need to ensure you are scanning a complex scene.
What constitutes a complex indoor scene? A scene that has a lot of contrast on both the IR stream as well as the color stream. An easy example is a MacBook keyboard:

This is because the black keys are clearly contrasting with the light gray chassis.

You might imagine a plant would be a complex enough scene. Not so!
You might also imagine a geometrically complex scene would be complex enough. Again, not necessarily!

In this picture, we see a geometrically complex scene, but there are very little high contrast areas in the IR stream.

While not perfect, the above scene was enough to successfully complete bracket calibration. The high contrast between dark and light created enough similarity between the scenes, and the software was able to do the rest.
Refinement
If you’ve made it this far, congratulations! You’ve made it through the hardest part.
Refinement is the last part of calibration, where you manually tweak the calibration the software determined was correct. We do this by allowing you to drag the depth feed’s color overlay to match the physical scene.
Please note! You do not need to perform refinement while looking outside! In fact, you might have better luck doing so indoors. We do our best to help you get the hang of it by working through this tutorial:

Once you think you’ve got it, find a scene with some very clearly-defined edges, like this scene here:

On iPads, you will drag the scene right and left. On iPhones, you will drag the scene up and down.
Once the color (not the spaces where there is no color!) matches the physical scene, tap “Save Calibration”.

The calibration state will save to the sensor.
Remember, there are two calibration states that need to be saved: with and without Wide Vision Lens, so be sure to calibrate with both.
Once you’re fully calibrated, you are good to go.
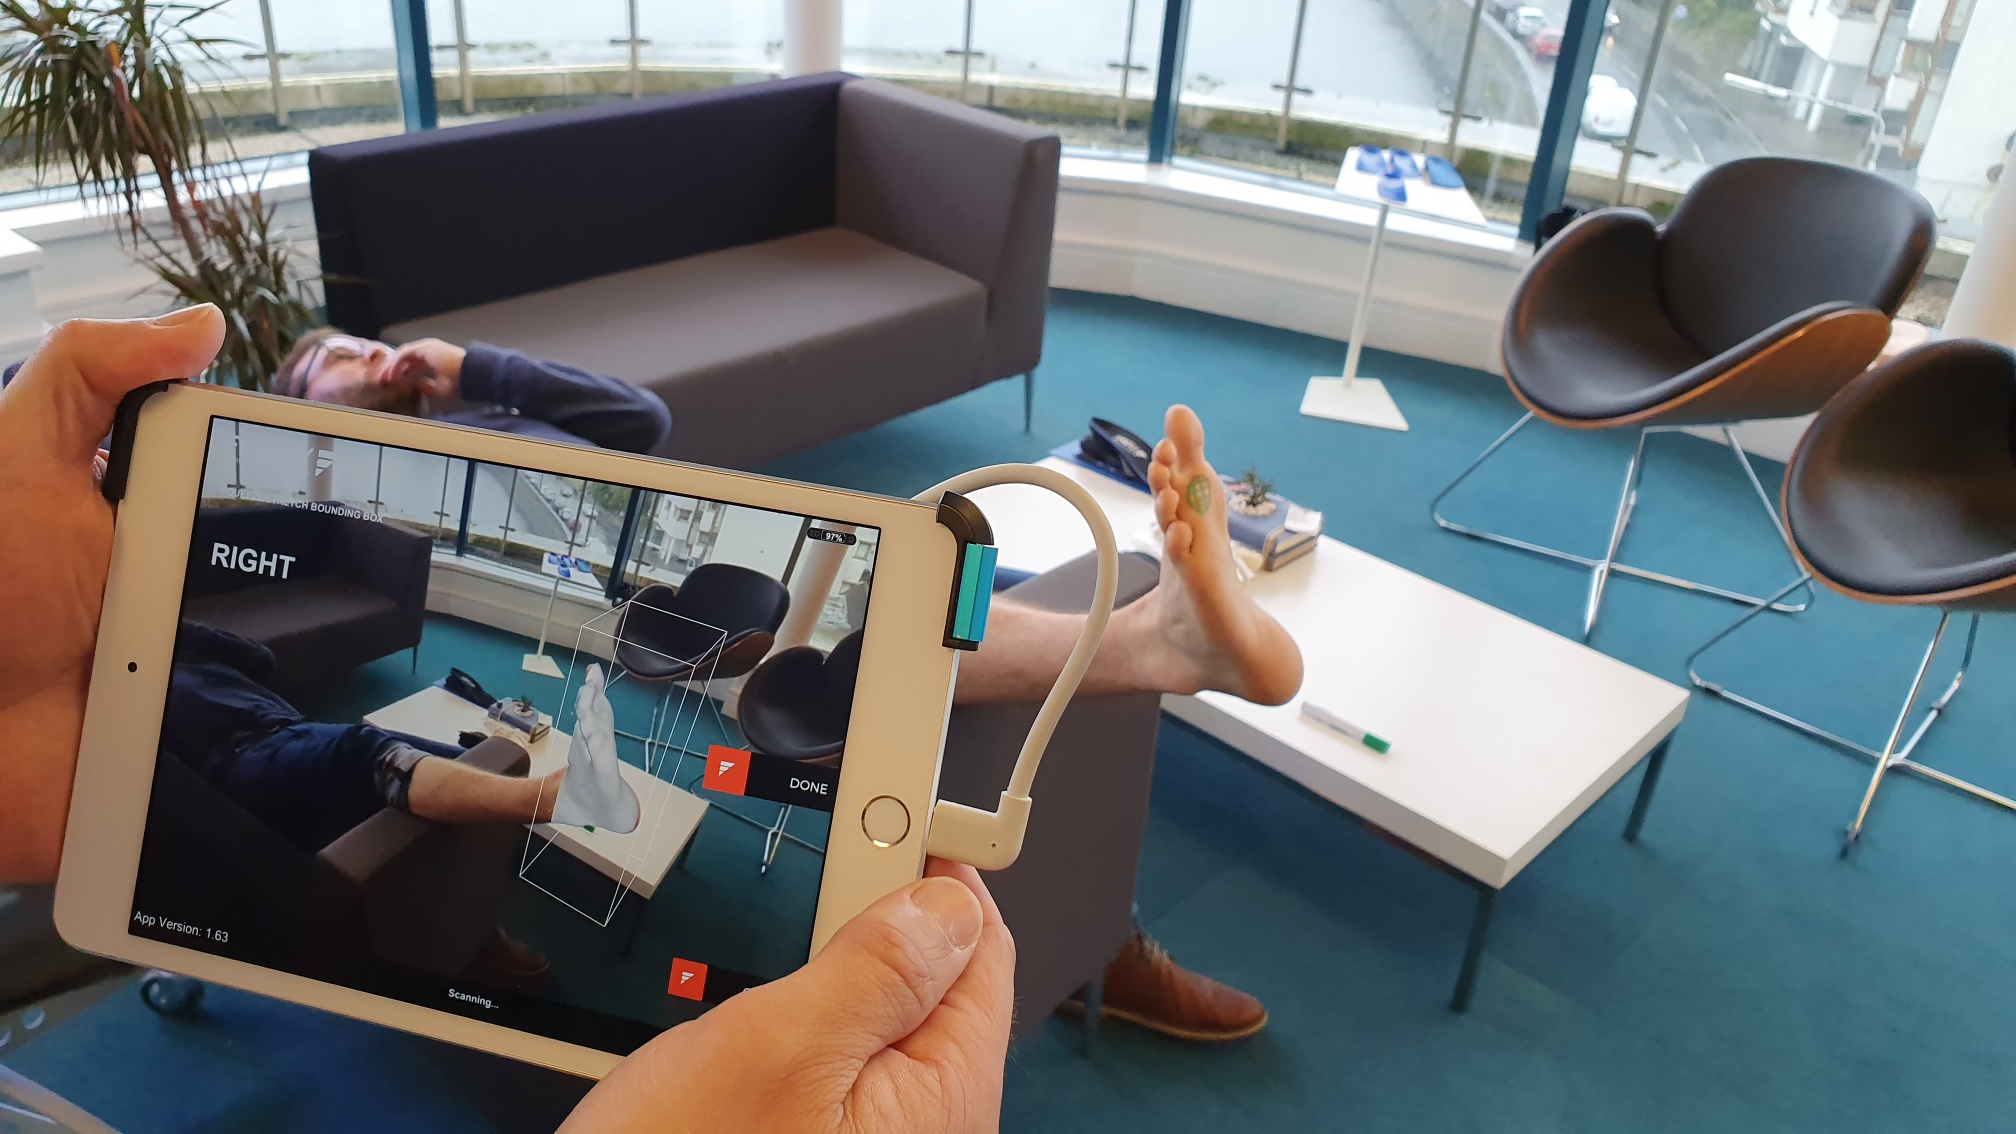
HOW DO I POSITION THE FOOT?
When using the FUSION scanning app the podiatrist is reliant on the patient to hold their foot in position for the short duration of the scanning process. To achieve an optimum scan the podiatrist should first position the patient’s foot before capturing the scan.
Below we present two demonstrative videos illustrating how to position the patient’s foot in both a prone position and a kneeling position.
LEAD TIMES
STANDARD ORDER:
- 7-10 working days Manufacture
- 2-4 Days Receipt & Delivery
RUSH ORDER:
- 5-7 working days Manufacture
- 2-4 Days Receipt & Delivery
COURIER RUSH ORDER:
- 3 working days Manufacture
- 2-4 Days Receipt & Delivery
DIGITAL ORDER:
- 7-10 working days
- from receipt of order to dispatch
RICHIE BRACE ORDER:
- 13-15 working days
- Manufacture & Delivery
MANUAL MANUFACTURE ORDER:
- 13-15 days Manufacture & Delivery
CAN I USE FUSION TO SCAN FOR RICHIE BRACE?
Currently the FUSION app is not designed to capture both the anatomy of the ankle and lower limb. This means data for Richie Brace can not be accurately captured using the application. Plaster of Paris is currently the most suitable method to capture the anatomy for bracing therapy.
HOW DO I ATTACH SCANS MY ORDER?
You don’t really need to attach scans when using the FUSION app, this happens automatically.
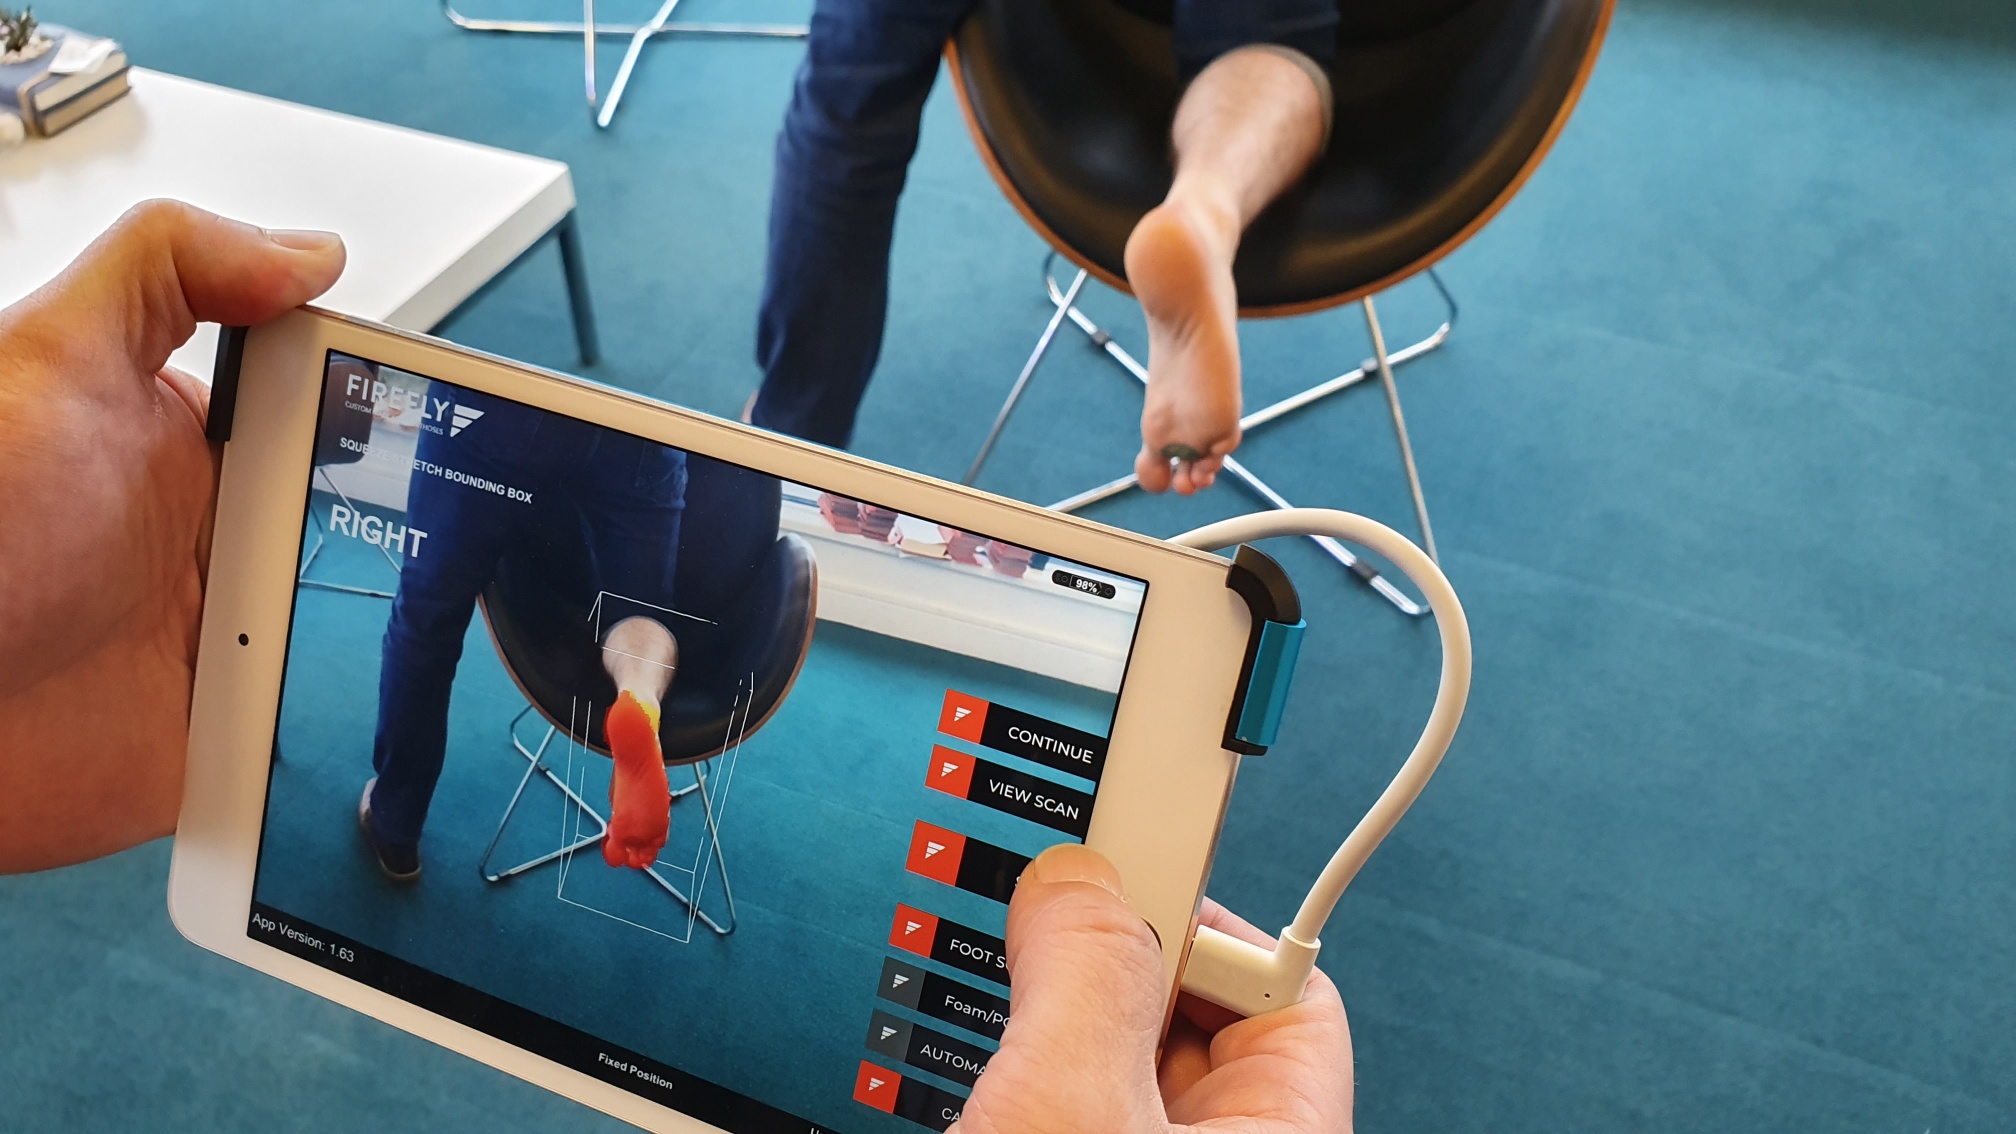
When scanning your patient’s foot with FUSION, you will select the left or right foot container by tapping the buttons on the bottom left of the screen. The app will open the left foot first, by default.
Once you have captured data in the left or the right container, you will tap the END SCAN button. FUSION will then automatically open the preview of the scan just captured.
When you are happy with the preview, you tap END PREVIEW. In the bottom left of the screen, the text for that container will turn green as confirmation that you have captured data in that particular foot container.
The app will then automatically open the opposite foot container and you can scan that foot, then preview the data and end the preview, where again you will see the text at the bottom right of the screen has turn green to confirm data has been captured and saved.
At this stage, the app has saved the data you have captured for both feet. You know this as the left foot / right foot text has turned from grey to green.
You can jump pack into either foot container to review the scans captured while in the scanning element of the app before the order has been submitted. At this point, you may choose to rescan a foot if you are unhappy with the quality or coverage of the scan captured for a particular foot.
It’s important to note, FUSION’s scan files are integrated with the prescription, they are never separate from the prescription like that of AMOS TOT or similar app. This means files can not be lost, misplaced in the wrong file, forgotten to be attached to an email etc.
When you are happy, submit the order and send me an email to let me know you have. I will then review the scans.
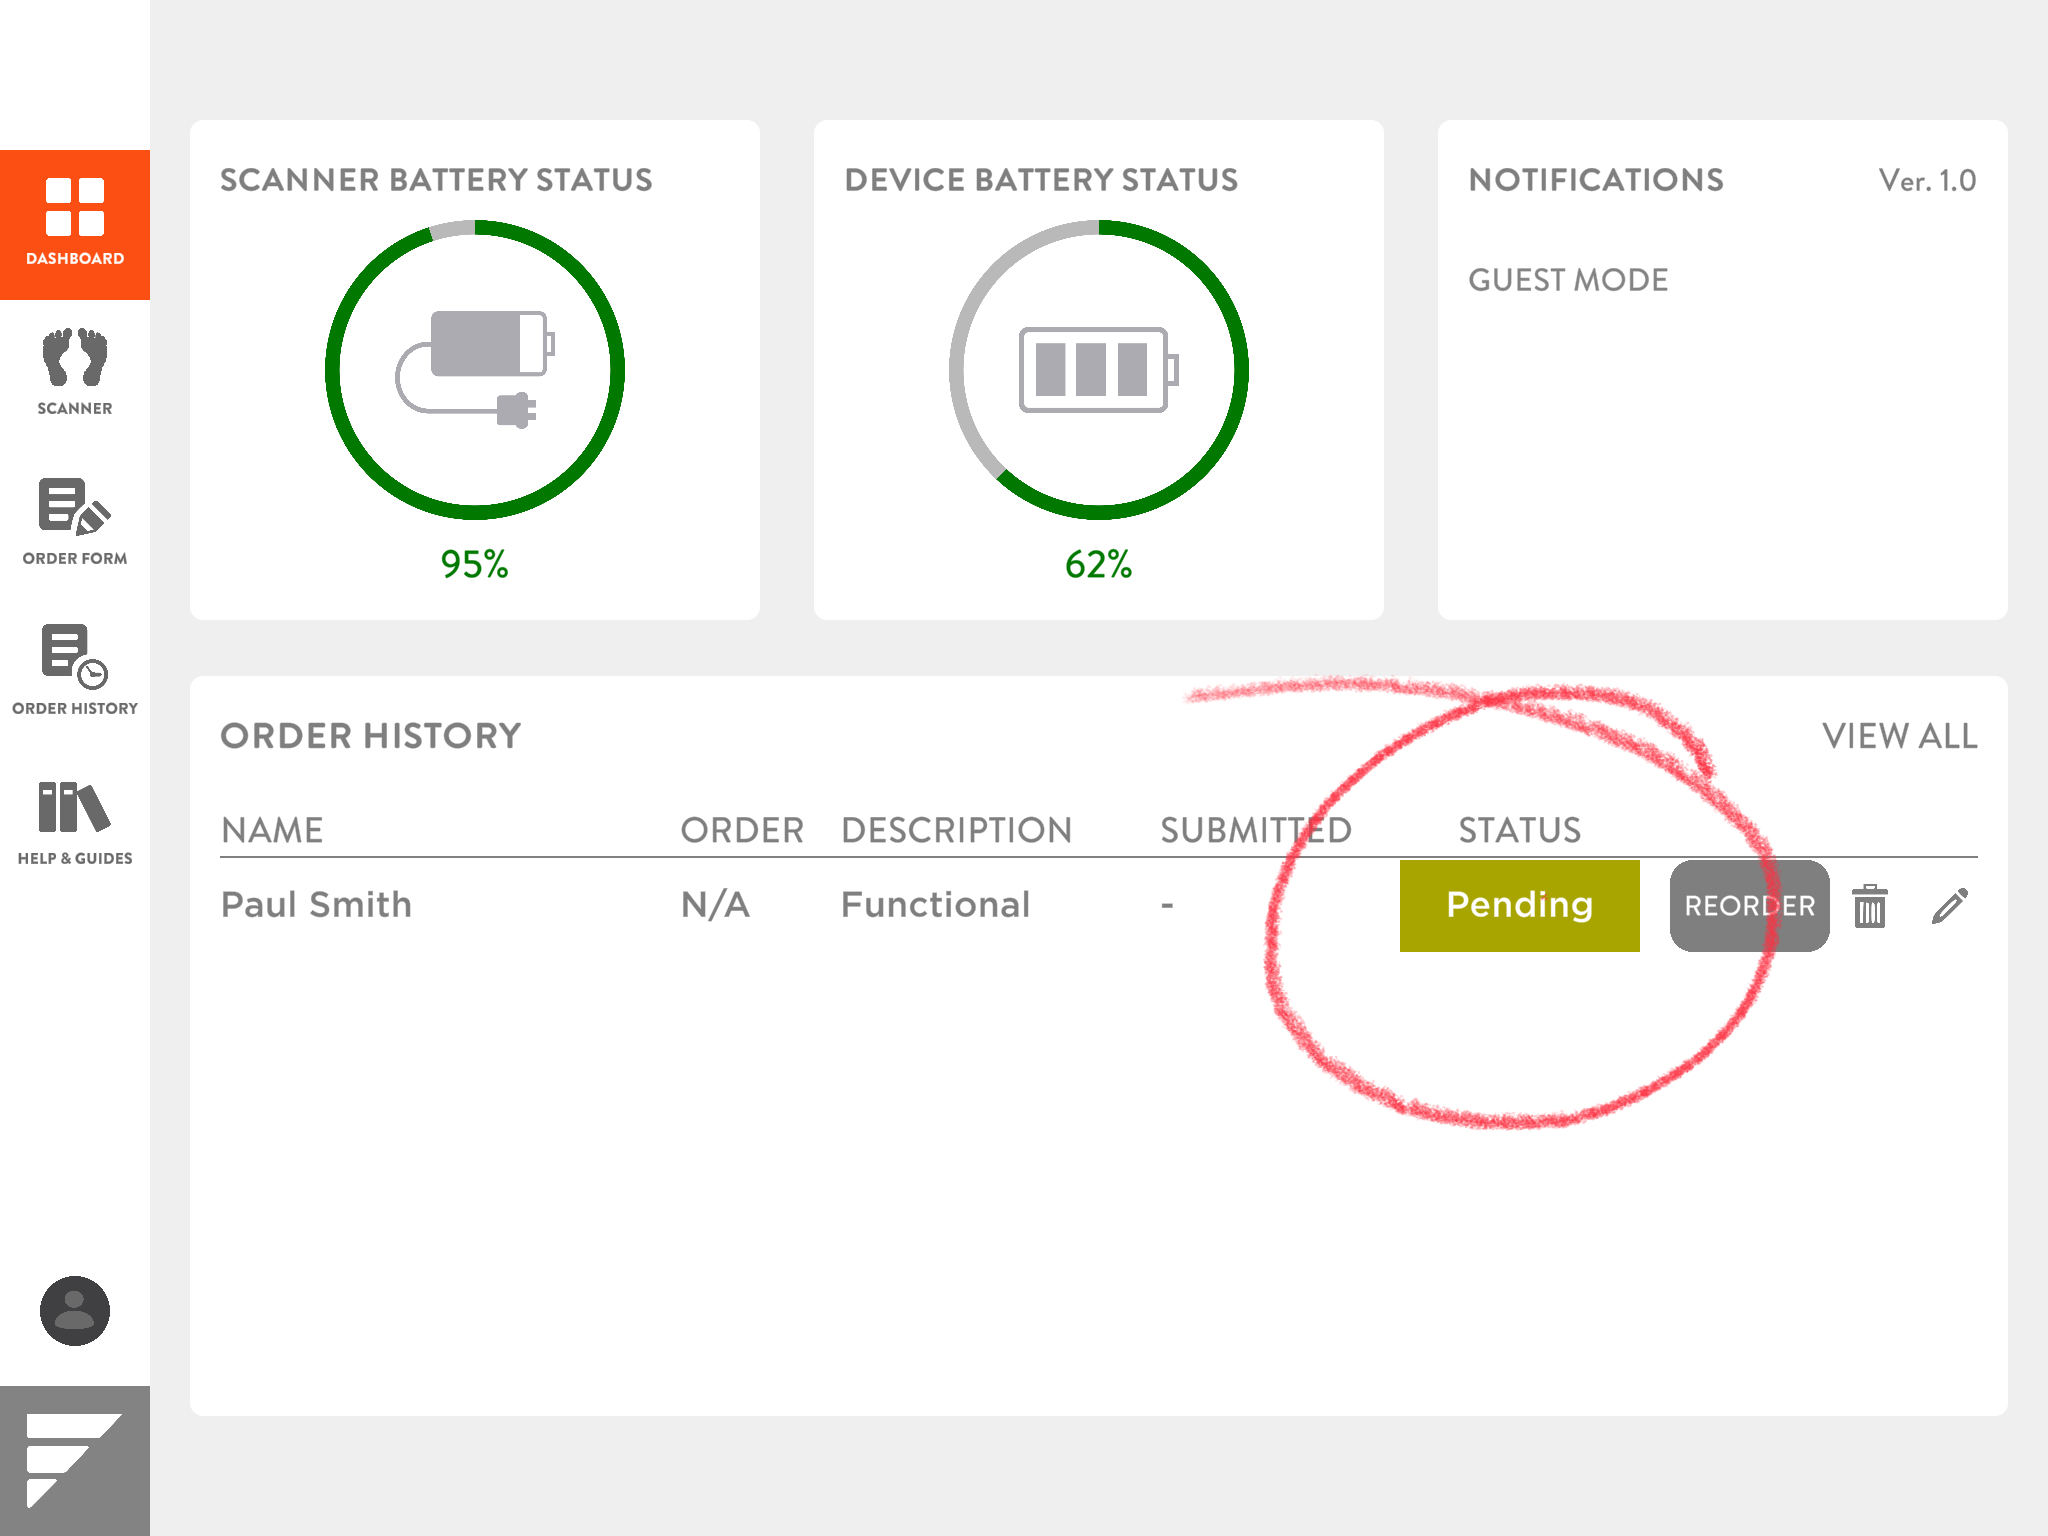
WHAT DO EACH DASHBOARD STATUS MEAN?
Here is an overview of what each status means.
Incomplete – amber
Order is missing a required element, e.g. scanned data or a required field in the order form is missing, such as patient name or shoe size.
Pending – yellow
The order has been submitted but has not been received by Firefly. The device is not connected to a suitable wifi connection.
In Review – blue
Order and scans have been submitted to the lab successfully but lab operation teams have not begun processing the order. Prescription details can still be edited at this stage.
Submitted – green
The order has been confirmed and has entered the processing workflow within the Firefly lab. Prescription details can not be edited at this stage.
Shipped – violate
The order has been shipped.
STRUCTURE SENSOR SCANNER
Structure Sensor hardware must be connected to the iPad to capture 3D scans when using FUSION.
The app is compatible with both Mark I and Mark II Structure Sensor scanning hardware.
IS MY iPAD COMPATIBLE WITH STRUCTURE SENSOR ?
CAN I MARK THE FOOT TO INDICATE ADDITIONS & MODIFICATIONS?
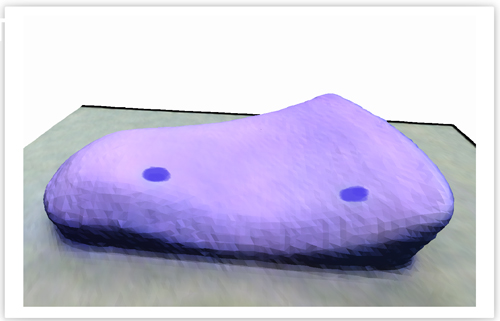
Yes, with the FUSION application you can mark the foot to indicate the position of the following additions and modifications: fascia groove, met bar and sweet sport.
The process of marking the foot is simple.
- using a green or blue marker, draw on the patient’s skin where you would like addition to be placed in the mirrored orthoses
- scan the foot using the FUSION 3D foot scanning application
- tap the preview button to view the scan and preview how visible your markings
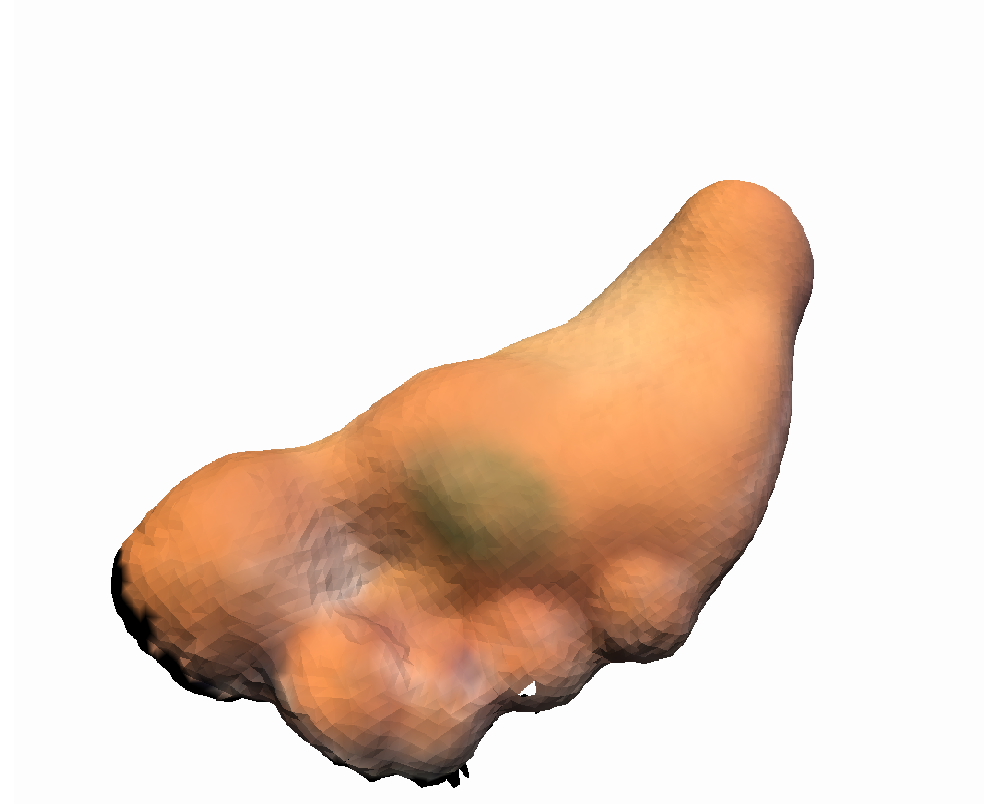
You should use a marker colour that gives the greatest contrast between the ink and the patients skin colour.
FASCIA GROOVE
When marking for a fascia groove, please use two dots to mark the start and end points of the groove on the plantar aspect of the anatomy. When we render the image in the lab we can them accurately place the groove as per your markings on the scan captured.
MY ORDER IS STUCK IN INCOMPLETE STATUS
- in the order form [access via the menu on left side of screen] section of the app, there are one or more required fields not filled in.
- scans have not been captured for the order.
To see if your scans are attached, jump into the scanner section of the app and see if the text for left foot and right are green in colour. If they are white, this means you have not captured your scans.
MY ORDER IS STUCK PENDING STATUS
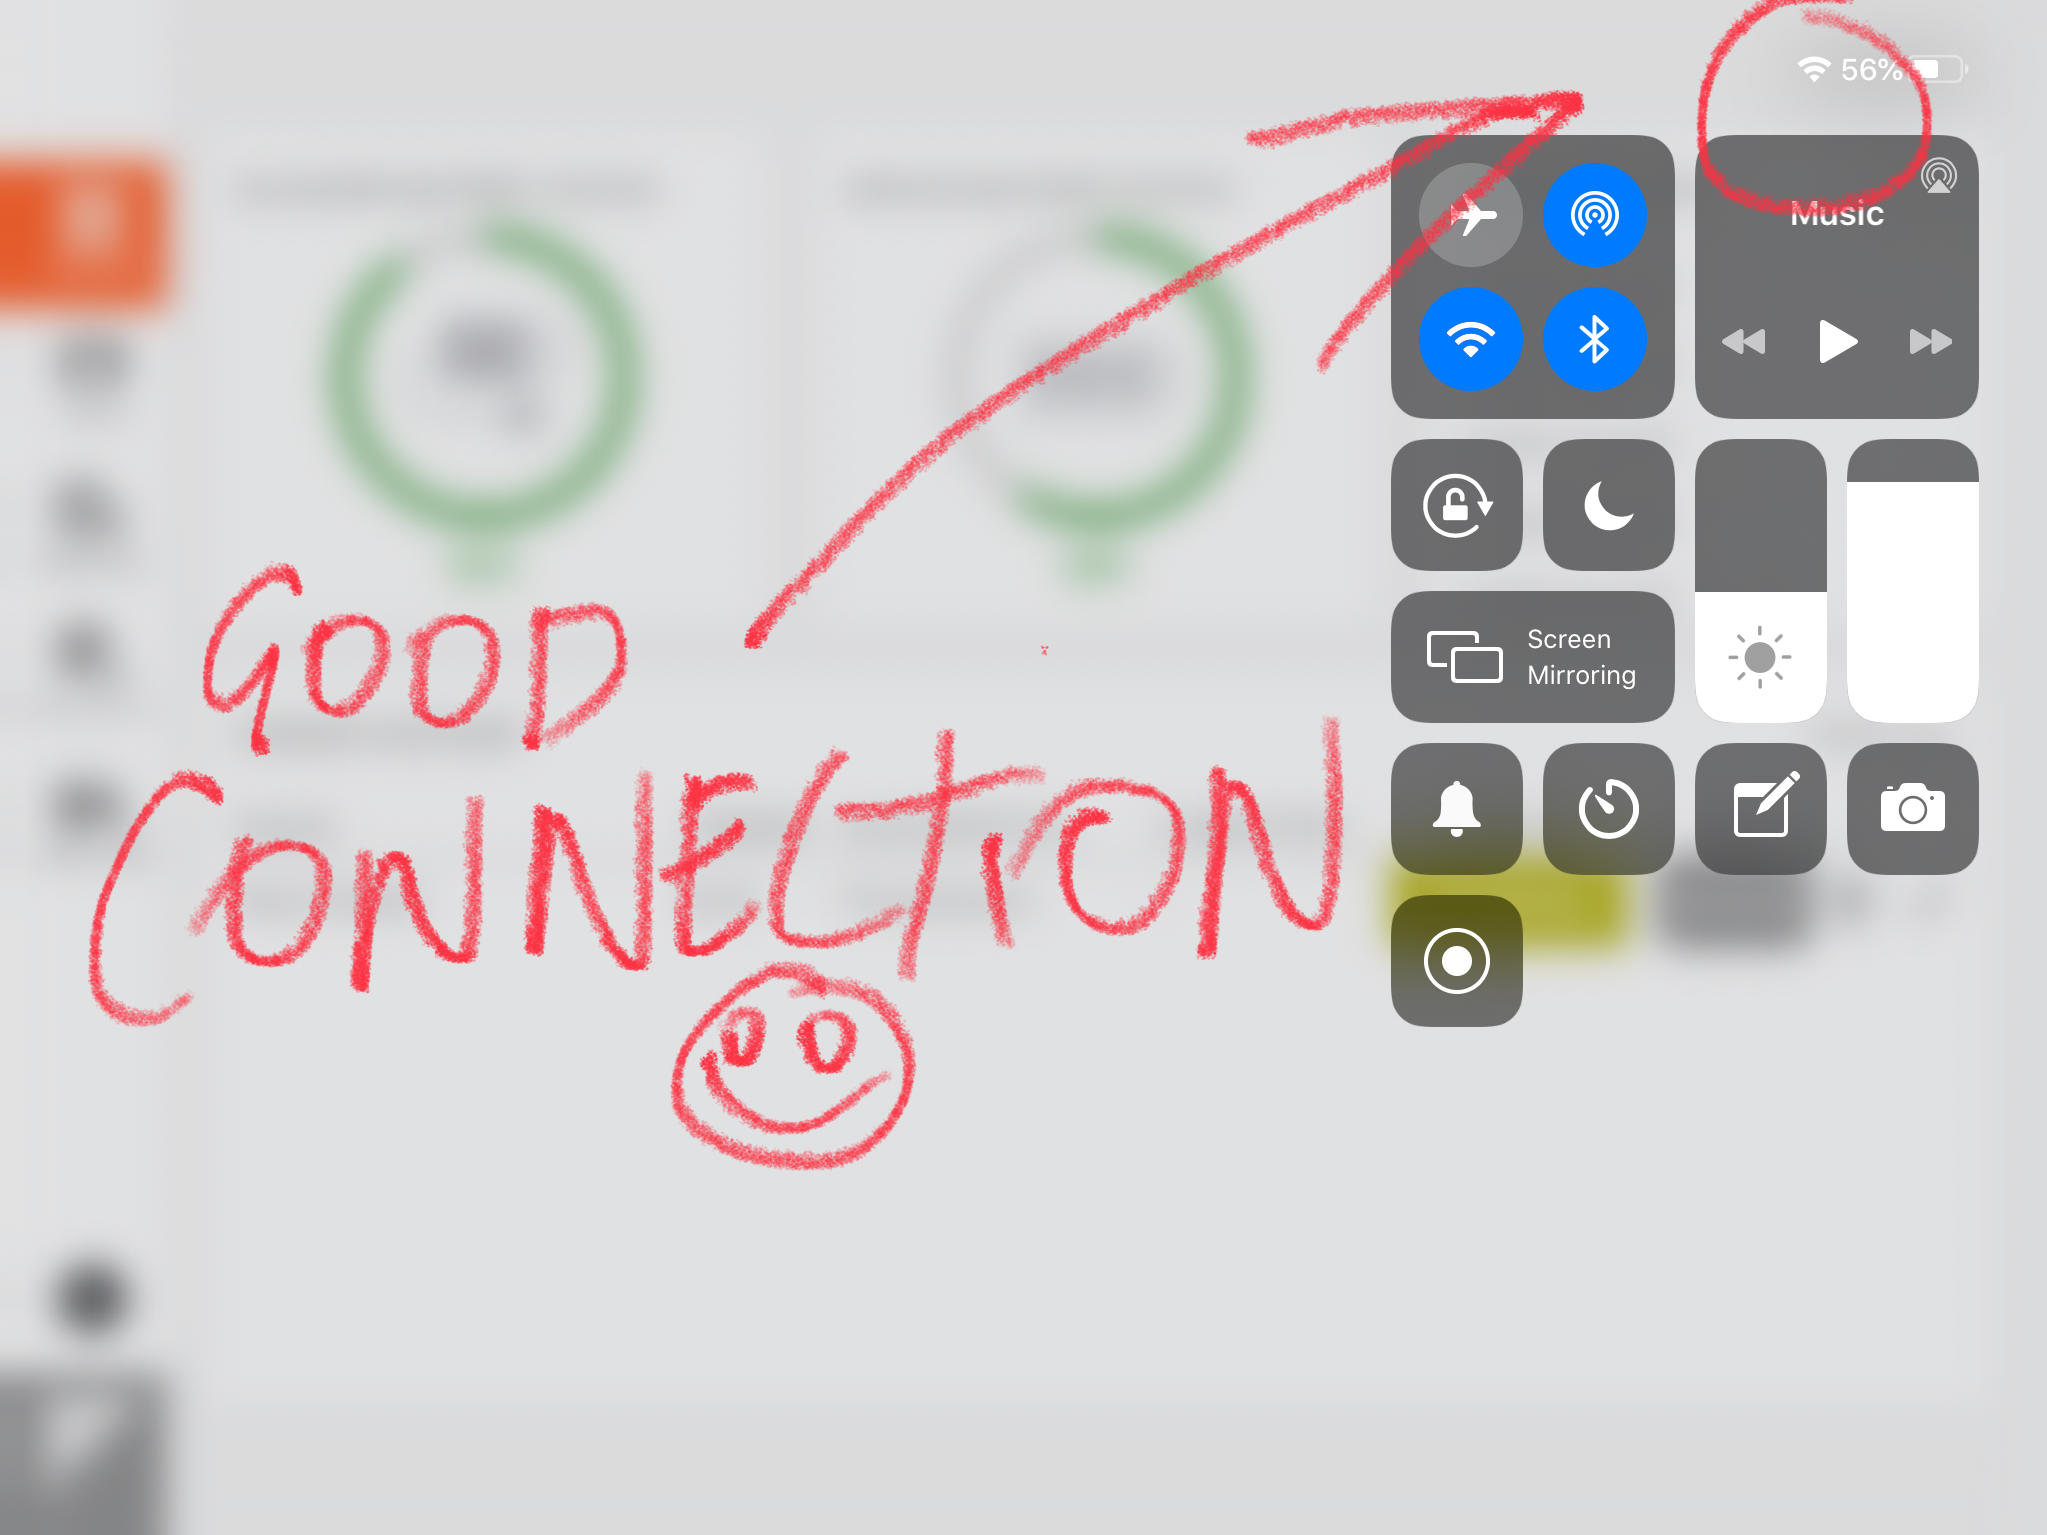
If you have submitted your order and it appears to be stuck in a pending state on your FUSION dashboard you may be experiencing a connectivity problem.
Check your iPad wifi indicator, if it is not displaying a full wifi connection your order may remain in a pending status until you have a full wifi connection. Move closer to your wifi router until your device indicates full wifi connectivity. 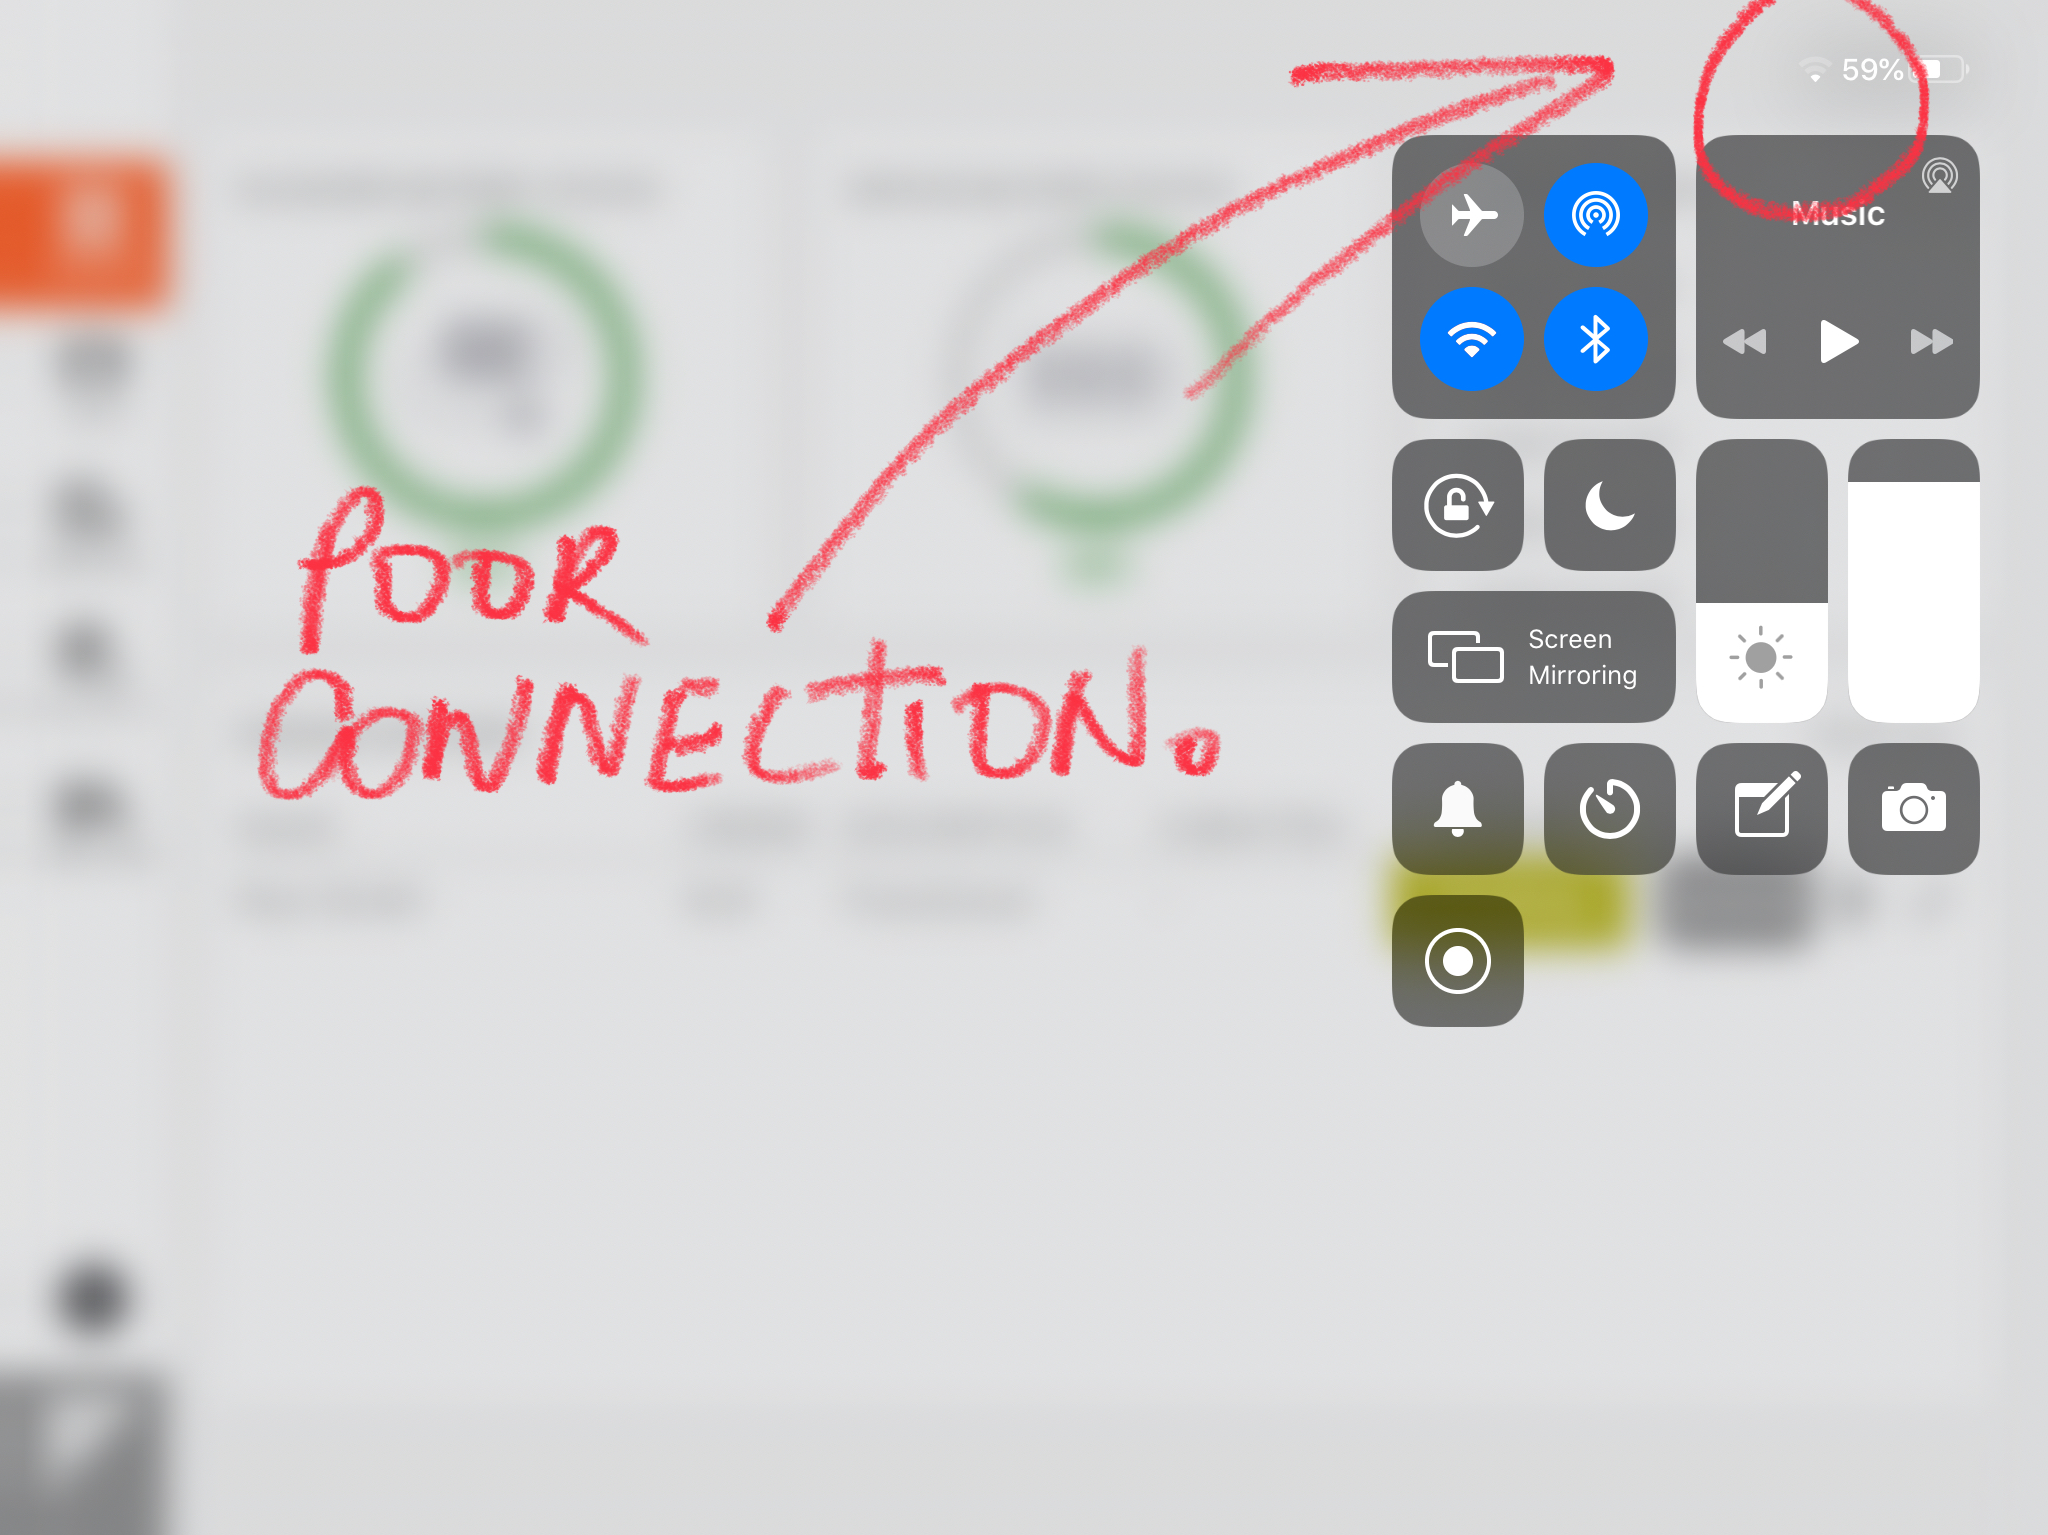
When your iPad is receiving full wifi connectivity your pending order should submit to Firefly and its status should change to In Review.
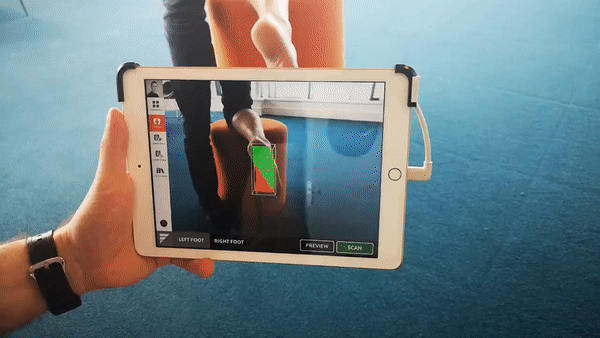
HOW DO I SCAN THE FOOT CORRECTLY WITH FUSION?
Scanning the foot is very simple with FUSION. Pressing the scanner button on the left-hand menu will open the scanning window.
Sizing the Bounding Box
Place the patient’s foot within the bounding box on the iPad screen. It is important the entire plantar aspect of the foot is within the bounding box.
The bounding box can be resized by placing two fingers on the screen and bringing them together to make the bounding box smaller or by moving them apart to make the bounding box bigger.
Determining Distance from Foot
When the box is correctly sized and the entire plantar aspect of the foot is comfortably within the bounding box, the plantar aspect of the foot will turn green to indicate the iPad is the desired distance from the patient’s foot. Red indicates the iPad is too far away from the patient’s foot and blue indicates the iPad is too close. When the foot is green you can tap the SCAN button.